Tuesday, December 31, 2013

The Last Card of 2013


Can you believe that 2014 is almost here?!! This is another year that has flown by - but I wanted to thank all of my blog readers for stopping by and visiting me throughout the year.   I know winter is just getting ready to kick in full gear, so I figured a nice bright flower card would be a great way to end the year.  May you have many blessings for 2014!

 I used this color inspiration from Lindy's Stamp Gang December Challenge for the inspiration for my card.  The colors were brighter than what I normally work with, but I still managed to shabby-chic them up a bit.


 After I shaped my flowers, I embossed them using HollyHock/Scarlet Plum EP.  I also added the dots to my Hellebore flower using Twilight Blue Slate.

 I built up many layers of powder for this architectural element using Aurora Amethyst and Silver Moon Turquoise


I used a Sizzix folder to emboss the wood planks for my background with a bright blue paper and painted it with watered down gesso.  I added in some washi tape for texture and spritzed some Blue Hawaiian Blue Starburst spray over the top.  I kept layering the mist and the gesso, and added a little bit of the Silver Moon Turquoise and Hydrangea Blue Mauve embossing powders over the raised areas.  I really love how the background turned out.

I'll see you back in 2014~  Have a Happy New Year!

Monday, December 30, 2013

Zva Creative December DT Blog Hop


Happy holidays to you! Zva Creative and our talented NEW 2014 Design Team welcome you to our December blog hop where we officially welcome many of our new team members to our monthly hops! We are very excited about this year’s team and are sure that you will be inspired by and love their work. Are you ready to hop along and get to know them better?

And as a bonus— today’s hop is EXTRA special because you will get a sneak peek of Zva’s newest products which are set to be released at the next CHA tradeshow!

The hop begins at Zva Creative’s blog! Be sure head on over to check it out! You will also find a complete list of all the participating blogs there (in case there is a glitch along the way). 

As you know, Zva offers many beautiful color groupings for pearls, flowers and crystals.  If you like what you see along the hop you can find a list of stores and online retailers that sell Zva HERE

I'm really excited to be hopping along for my first time as a member of the Zva Creative team! I hope you enjoy the card that I have to share with yo today.  I have featured one of our new crystal swirls - CR-07CA-114.  It is the perfect size to make a statement on a card.


 I also got a chance to play with the set of PanPastels that I got for Christmas.  After I embossed my patterned paper, I brought out the raised areas using the pastels.


 The roses were made from patterned paper and die cut with Spellbinders Bitty Blossoms.  I also tucked a large Zva Creative Crystal ( CRW-05CA-169) into my floral cluster.


If you would like to play along with our design team, just follow along the blog path.  I am linking to one of the Zva designers and that designer is linking to the next and so on. Be prepared to be inspired along the way!
The Blog Hop starts today, December 30th and runs through midnight US Eastern Standard Time on Tuesday, December 31st.
***Prizes***
Hidden on FIVE of the designer’s blogs is a Zva Creative prize package! Winners will be randomly chosen after the hop is over. All you need to do is leave a comment on this Blog Hop post... you do not need to leave a comment on each and every designer's blog post to qualify. However, the more times you comment along the blog hop path, the more chances you will have to win.

The 5 winners will be announced on Wednesday, January 1st on Zva Creative’s blog. We will do our best to notify each winner, but it's best if you can pop in to Zva’s blog on Wednesday to see if you are a winner!

We also thought it would be more fun to add even more chances to win our blog hop prize!  To increase your chances of winning:
* Comment to let us know that you posted on your Facebook page about our hop (link to any of the blog hop posts)
* Comment to let us know that you "tweeted" about our hop (link to any of the blog hop posts)
* Comment to let us know that you asked your local store to carry Zva creative products.  If they already do, that's fantastic, maybe you can suggest other products that they don't carry.
*Hop over to Zva’s facebook page and “like” our page or leave a comment there to tell us that you stopped by if you already like follow us there!

 The blog hop begins here at Zva Creative’s blog. Your next stop is Carole Maurin. Enjoy!

Thank you for joining us!
 
P.S. Mark your calendar to join us again on January 27th for our next Zva blog hop!
 

Thursday, December 26, 2013

Heartfelt Creations Inspiration


Heartfelt Creations Products and Products Carried by HC 

HCDP1 238 Floral Key Paper Collection
HCDP1 237 Antiquity Paper Collection
HCPC 3569 Burnished Key PreCut Set
HCPC 3533 Sun Kissed Fleur PreCut Set
HCPC 3303 Posy Patch Flower PreCut Set
HCD  741 Burnished Key Die
HCD 735 Gift Ensemble Die
HCD 723 Garden Romance Die
HCD 734 Sun Kissed Fleur Die
HCD 701 Posy Patch Die
HCD 740 Sweet Juliet Die
Spellbinders Opulent Ovals
1259723 Art Institute Glue (Dries Clear)
Paper Blossoms Molding Mat
Paper Blossoms Tool Kit 
Rose 3D Metallic Stamp Paint
Other Products Used
Tsukineko Ink:VersaMagic - Pixie Dust, Pink Petunia, Niagra Mist; Memento- Tuxedo Black
Zva Creative pearls
3/8" May Arts Ribbon  GC-8-23
WorldWin Papers Cardstock
Xyron Mega Runner, Teresa Collins Foam Adhesives

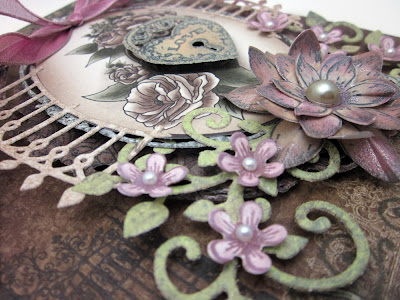
Cut a decorative printed panel from the paper collection and mount to a 6" x 6" card base.  Hand cut the central oval from the patterned paper.  Cut two layers (the two largest from the Opulent Ovals set.  Use foam adhesives between each layer to mount to the card.  Cut two curved gates from the Garden Romance die set and glue to the sides of the printed oval and mount on the Opulent Ovals. Stamp and cut the lock and key using the corresponding die.Use foam adhesives to mount the lock to match up with the printed version.  The key will be nestled into the flower cluster.  Cut two of the leafy vines from the Gift Ensemble Die set.  Arrange at the bottom of the oval.  Stamp and cut the smallest Posy Patch flowers. shape and glue to the vine.  Add pearls for the centers.  Stamp and cut the Sun Kissed Fleur flowers.  Color with inks and rub a small amount of 3D Stamp Paint over the edges.  Shape and apply to card.  Cut the ticket sentiment from the patterned paper.  Add a small Posy Patch flower and snippets of greenery from the Sweet Juliet Die Set.  Finish with a bow.

Saturday, December 21, 2013

Who Can Resist a Christmas Tag? Video Tutorial

 Hi! It's almost Merry Christmas time, but just in case you still need some tags to add to your holiday wrappings, I've got a video to share with you today that will teach you three different resist techniques using the wonderful Art Anthology paints and Hampton Art Stamps.  If you're all done with your Christmas projects, than don't worry - you can use these techniques any day of the year!


Wednesday, December 18, 2013

Heartfelt Creations Inspiration


Heartfelt Creations Products and Products Carried by HC 

HCDP1 238 Floral Key Paper Collection
HCDP1 234 Daphne Paper Collection
HCPC 3570 Floral Doorway and Latch PreCut Set

HCPC 3575 Script Key Background PreCut Set
HCPC 3500  Open Vintage Floret PreCut Set
HCPC 3532 Beautiful You PreCut Set
 HCD 732 Decorative Flower Pot Die
HCD 727 Vintage Floret Die
HCD 733 Decorative Lattice Swirl Die
1259723 Art Institute Glue (Dries Clear)
Paper Blossoms Molding Mat
Paper Blossoms Tool Kit
Other Products Used
Tsukineko Ink:VersaMagic - Pixie Dust, Pink Petunia, Niagra Mist
Want2Scrap pearls
Netting
Stickles- Crystal
Xyron Mega Runner, Teresa Collins Foam Adhesives

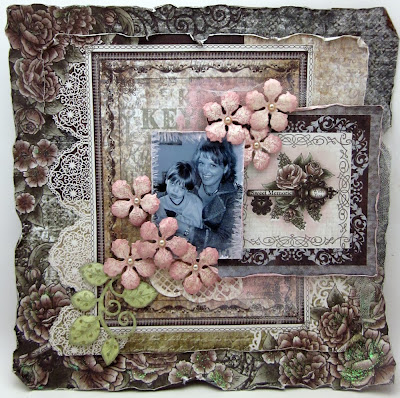
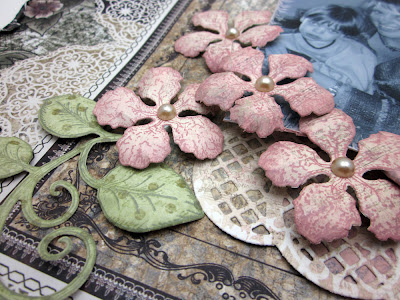
Sweet Memories with You is a 12 x 12 layout.  Distress the edges of your base patterned paper. Paint a thin layer of glitter glue over the printed flowers. Cut a second layer 10" x 10" and fussy cut the printed lace edge.  Distress the other edges. Stamp the Script Key Background in the open area of the patterned paper.  Cut a 6 x 6 decorative paper panel, turn over and lay in the area that it will be place.  Ink around the edges within the printed rectangle using the light pink ink.  Remove the 6 x 6 square.  Cut a mask for the square with the opening 3 5/8" square, so that only the inside printed square will show.  Lay a piece of vellum or tracing paper over the central image, trace around it, and cut it out and use this as a mask over the floral key image.  Stamp the remainder of the exposed paper using the wood pattern from the Floral Doorway set.  Glue netting to the backside of this square and attach to layout with foam adhesives. Die cut a decorative lattice swirl and glue to the left bottom corner of the 6 x 6 square.  Add your photo with foam adhesives. Stamp and cut with the matching die, Vintage Floret flowers.  Arrange on layout and add a stamped and cut vine using the Beautiful You set.  Add pearls to finish off the layout.

Monday, December 16, 2013

May Arts Handmade Christmas Gift Blog Hop

 The May Arts Ribbonistas are having another fun hop today!  We want to share with you handmade gifts that you can make using beautiful May Arts Ribbons.  And since it is the giving time of year,  The Ribbon Lady is going to give one lucky fan a choice of 3 spools of ribbon.  Leave comments along the hop to enter (the more comments, the more chances you have to win!)

I'm not a great seamstress, but this headband I created is easy enough to sew, even I can do it!

I used scrap fabrics and sewed ribbon down the front center. I left the narrow checkered ribbon long on each end to use as ties.

I frayed some of my fabric and sewed it around the May Arts Sheer Frayed Flower.
 This has already been a big hit - so I think I will be whipping some more up!
Be sure to visit the rest of the blogs to get great ideas for last minute gifts.


May Arts Ribbons Used

Saturday, December 14, 2013

Chalkboard Stamping Video Tutorial


I hope you are having fun, getting ready for Christmas! If you are all ready for it, then maybe you are creating something fun in your studio?  Today I have a video to share with you that will show you how to add some color to your stamped chalkboard images.  Have fun!


Wednesday, December 11, 2013

Heartfelt Creations Inspiration


I've got a Christmas card to share with you today that uses Heartfelt Creations non-Christmas stamps and dies (except the sentiment of course!)


Supplies:
Cardstock: WorldWin Papers
Patterned Papers: Heartfelt Creations – Classic Editions
Stamps: Heartfelt Creations ( Mini Vintage Floret, Joyous Noel, Vintage Floret Frame)
Dies: Heartfelt Creations ( Vintage Floret,  Decorative Leafy Frame,
Embossing Powder: Wow (gold)
Ink: Clearsnap – Top Boss Embossing Ink; Pigment Ink (Chianti)
Pearls: Want2Scrap
Ribbon: May Arts  3/8”Wired Sheer
Glitter: Stampendous  Pearl Ultra Fine - Melon
Adhesives:  Xyron Mega Runner; Xyron  Creatopia

Directions:  Stamp the Floret Frame background stamp with watermark ink, and heat emboss.  Line the matching die up with the stamped image, and run through die-cut machine.  Cut a piece of patterned paper the same size as the decorative frame.  Run through Xyron Creatopia, and apply adhesive to the right side of the paper.  Adhere the stamped/die cut frame to this sheet.  Sprinkle with a transparent glitter, so that there are no sticky areas remaining.  Stamp and die cut flowers with the matching die.  Slightly shape the flowers and attach to the corresponding flowers on the frame, using a foam adhesive.   Add pearls for the flower centers. Die cut a 2nd cut from the frame, using the dark red patterned paper.  Remove the center circle, stamp the sentiment with watermark ink, and heat emboss with gold.  Adhere to the center of the frame.  Mount the frame on the same red patterned paper, and apply to a 5 x 7 card base.  Finish with a ribbon bow at the top left corner of the frame, and a length of ribbon across the bottom.

May Arts Christmas Boot

 
 This week the May Arts Ribbonistas are hopping along with Scrapbook Adhesives to bring you lots of fun - and of course some prizes.  Be sure to leave comments on any of the blogs participating this week for your chance to win 2 spools of ribbon and an assortment of adhesives.

I recently got a cute pair of leg warmers - but what was even more awesome was the heavy cardboard boot form that they came on!  So this is my upcycled boot.  I used Graphic 45's Twelve Days of Christmas Paper to cover the boot and attached it with the Crafty Power tape.  I wrapped the 1.5" grosgrain ribbon around the boot, and added a layer of patterned paper over the top of it.  I used a Crop-a-Dile to punch holes in the boot, and lace it up with 1/2" Solid/Wrinkled Ribbon.  I fussy cut images from the paper and adhered them with the Crafty Foam tape to finish off my upcycled boot.

Thanks for stopping by, and don't forget to leave those comments!

May Arts Ribbons

 Partners In Craft Supplies


Tuesday

Wednesday

Thursday

Friday


JustRite Friday Challenge

I had so much fun making gift bags, I knew I wanted to make one for the last JustRite Challenge of the year ( It's in the Bag). This bag however, was bought, rather than made, and I just decorated it
.


I stamped JustRite Christmas Holly Background onto dark green metallic paper and embossed it with silver powder.  I colored in parts of the image with Copic Markers to bring out the design more.  I layered this panel with JustRite's Vintage Labels Six die - and used the script portion of the Merry Christmas Background stamp for the central oval.  I created a flower using Spellbinder's Layered Poinsettia - and used May Arts silver leaves to frame it.  I finished the rest off with other May Arts ribbons and some blingy Christmas greenery I got at my local craft store.  Now I just have to finish my shopping to have something to go in this pretty little bag!

Tuesday, December 10, 2013

Xyron 30 Days of Holiday Projects


Do you have all of your Christmas shopping done? How about your wrapping?  No?  Well, why not make your own cute gift bags for your gift giving this year?  This is a really fun was to make a special present even more memorable.

You can play around with the sizes of your finished bag, but this one is 6 1/2" tall x 1 1/4" deep (the perfect size for jewelry or some other wonderful little goodie!)

Cut a sheet of cardstock 7 3/4" x 12".  With the long side along the top of your score board, score at  1 1/4",  5 3/4", 7", and 11 1/2".  Turn the paper a quarter turn and score at 1 1/4".  Before assembling the bag, use your Xyron 5" Creative Station to apply adhesive to the patterned papers that you want to use to decorate your bag.

 Use the Xyron Double Sided Tape to assemble the bag.

Ink the raised side of an embossing folder and carefully place white cardstock in the folder  and emboss with your machine. This will create a letter pressed image.  Fussy cut the tree.  Use Xyron Adhesive Dots to add sequins ( 2 sizes stacked) as ornaments.  Add a dot of dimensional paint to the center of the sequins.  


Apply ribbon to the bag using the double sided tape, and adhere the embossed tree over the top.  Use the Xyron/Teresa Collins stapler to add a snippet of ribbon to the top edge.

 Add some tissue, your present, and you are all set!


Supplies
Sequins